This article will explain how to setup data obfuscation in QRadar using regex. There will be times where you may need to mask certain data coming into your SIEM platform for various reasons for your organisation. For example it maybe to mask PII (Personally Identifiable Information) data in order to comply with regulations such as GDPR (General Data Protection Regulation) for businesses operating within the EU.
Some important caveats to remember regarding Data Obfuscation in QRadar are as follows:
– Data obfuscation will only apply to data after the configuration for data obfuscation have been setup. Any data that came into QRadar before will remain in its unobfuscated state.
– If you have custom rules setup in your QRadar platform that relies on data in its unmasked form, which will then be getting masked, then you will need to update your rule to reflect this change. For example if you have a rule setup that triggers when the username field contains “Joe Blogs” and you then go on to obfuscate the username field, your rule will no longer work, as QRadar is not able to trigger rules on obfuscated data.
More information around Data Obfuscation in QRadar can be found here: Sensitive Data Protection
Scenario
In this test scenario we will be using incoming events from a Windows client machine that has been setup to send its security logs to QRadar SIEM. The event in particular that we will be using in this test scenario is Event ID 4624 (An account was successfully logged on), this event is generated when you successfully logon to a computer. This event gives you a wealth of information including which user logged in, how they logged in and where they logged in. You can see an example of this event and how it looks in our QRadar Lab below.
So imagine, we needed to mask the username for all Windows Event ID 4624 coming from our test machine, due to a policy requirement within your organisation, how do we set that up in QRadar?
How to configure Data Obfuscation
Step 1 – Familiarise yourself with the exact data you are trying to mask. This is important because you need to know the exact data you want to mask, especially when it comes to Windows logs. If we take our scenario as an example, we are looking to mask the username field from the event. However you can see from the image below Account Name pops up twice for Event ID 4624, so we want to make sure when we are writing our Regex, we will be configuring it so that it masks the correct Account Name. 
Step 2 – Go into the Data Obfuscation Management feature which can be found in the Admin tab under Data Sources. The first step is to create a New Data Obfuscation Profile. A data obfuscation profile can be thought of as a container. For example in our scenario we will be creating a profile called Username Obfuscation Profile and we can use this profile as a container to group all the Data Obfuscation Expressions for usernames. So in this scenario we will be masking the usernames coming from the Windows Event ID 4624, however say there was a new requirement for your organisation where you also wanted to mask usernames coming from your proxy server, well you could use the same profile and create a new Data obfuscation expression for your proxy usernames. This will allow for better management as it can allow you to group your data obfuscation expressions however suits your organisation and allows you to reduce the number of key stores you have to maintain.
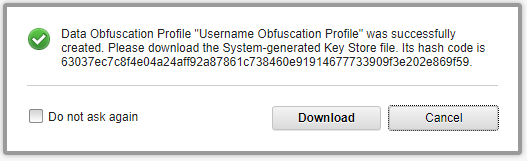
When setting up the profile you will be asked to generate an Obfuscation Key Store, the key store file can then be downloaded to the local system. It is recommended to keep the key store in an alternative and safe location within your organisation. The key store is used to Unlock the profile should you wish to make changes. It can also be used to unmask the data you will be masking using the profile, so it is imperative to ensure the key store can only be accessed by those who have the relevant authority. 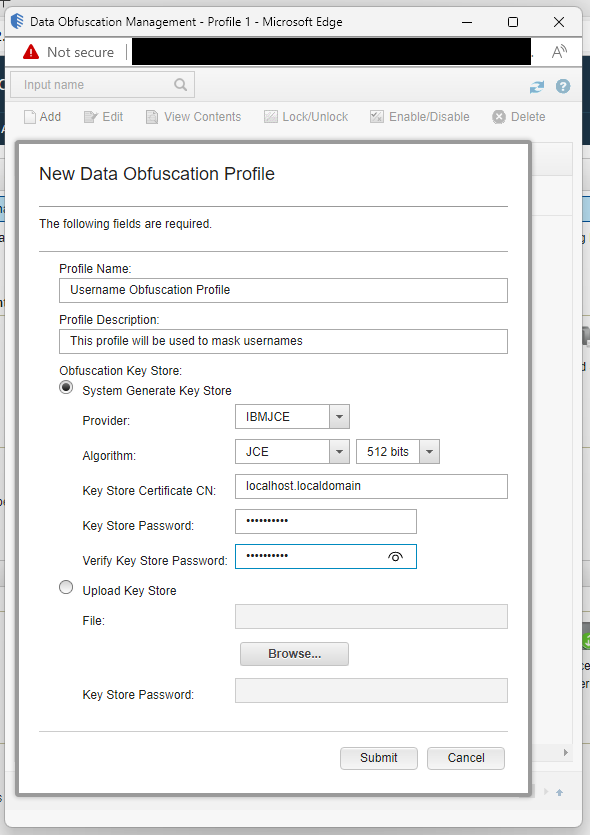
Step 3 – Open the profile that has just been created, you can now add a New Data Obfuscation Expression. Give the expression a suitable name and a description of what data the expression is looking to mask. For our example we will give the obfuscation expression the name “Event ID 4624 – Username”, this gives a quick summary of what event and field we are looking to mask data from. 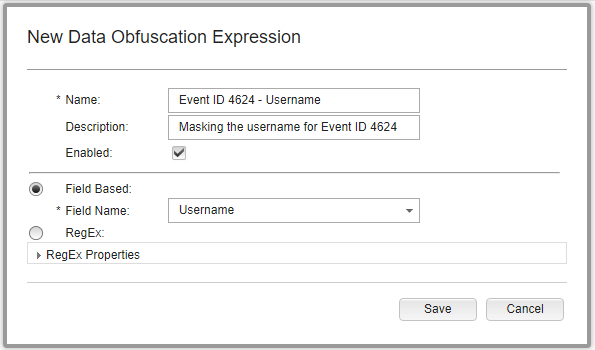
You will notice there are two ways to configure the obfuscation; Field Based or RegEx. I have not tried field based obfuscation, although it is my understanding that if you were to use the field based obfuscation method then you cannot specify the obfuscation of your data for a specific log source, event name or category. So if we were to select Username from the Field Based option, QRadar will obfuscate every single event that parses the data for username into the Username field, which is probably not what you are looking to do for your organisation. So for our scenario, we will be using the Regex option to configure the obfuscation of the username field for Event ID 4624 from our Windows machine. We can fill out the fields as set out in the below image. 
As mentioned in Step 1 in order to ensure you are obfuscating the correct Account Name (i.e. the user who logged onto the machine) we need to ensure the Regex is written to mask the Account Name from the New Logon section. There are lots of ways of writing Regex to get to the same desired outcome, but the main takeaway is to ensure it is written as efficiently as possible, as a badly written Regex could impact the performance of the system. We will use this Regex to mask the second Account Name in the New Logon section: \bNew Logon\b.+\bAccount Name\b:\s+([^\s]+)\s+\bAccount Domain\b
Capture Group will stay as 1. This is because the Regex is only matching and capturing 1 piece of data (the username), if the Regex was designed to pick up, lets say both Account Names, and its the second Account Name you need masked, then you would set the Capture Group to 2, to indicate it is the second one you want masking.
Log Source Type indicates which type of log source you want the obfuscation to happen on, in our case it will be Microsoft Windows Security Event Log as that is what Event ID 4624 is. Optionally, you can further filter the obfuscation for specific a Log Source, this is useful if say your organisation has sensitive data coming from one specific log source and not any others, then it would make sense to just mask the data from that log source only.
The Event Name is where we will be selecting the exact event we want the obfucation to occur on, so here will click on Browse, where a new window will pop up allowing us to search for the exact event name, the easiest way to do this would be using the QID of the event, which you can find in log activity when you open up a 4624 event. Once all of these fields have been filled out, you can Save the New Data Obfuscation Expression. 
Finally, ensure that your Obfuscation profile is enabled.
Step 4 – Now we will test see if the obfuscation will work for masking the username of the Event ID 4624. To do this we can simply lock our lab machine and unlock it again, this will generate a series of logoff/logon events. Once logged back in we go into QRadar Log Activity set the filter to look at our lab machine events, and in particular filtering it to event ID 4624, and this is what we should see in the log activity:![]()
As you can see the username for this event has been obfuscated, the original username that we used to logon to our local lab machine was Win11Lab1User. To confirm that the events are truly obfuscated, lets compare the event in the lab machines Event Viewer to the event in QRadar. 
We can see from the log in Event viewer that the user Win11Lab1User logged into the local machine called WIN11LAB1. Of course in Event Viewer these details will remain in their unobfuscated form as that is the source of the event. Lets also make a note of the Logon ID which we can use to confirm the same event in QRadar. 

We can see from the raw payload of the event in QRadar, the username that has been used to log into the local machine WIN11LAB1 has been completely obfuscated by our Regex Expression that we implemented earlier. We can also see the same Logon ID in the raw payload in QRadar that matches up with the Logon ID of the event we saw in Event Viewer earlier confirming this is the same log that came from that machine into QRadar.
You can deobfuscate the data by using the Key Store file and password we created at the beginning when setting up the Obfuscation profile. For step by step guides on how to do this, IBM Deobfuscation GuideDeobfuscation GuideDeobfuscation Guidehave a simple to follow guide here: IBM Deobfuscation Guide